
Launch practical
About 60 minutes
- Set up the bench with the 8 items of apparatus.
- Take the readings yourself, into the results table you draw first.
- Process your results and plot the graph.
- Answer exam questions on your own results, which you mark against the mark scheme.
Runs in your browser: a 3D bench with 2D close-ups of each instrument for exact readings. Nothing to install and no account.
What you measure, and how
One run takes 20 readings. You take every one yourself, the way you would in class.
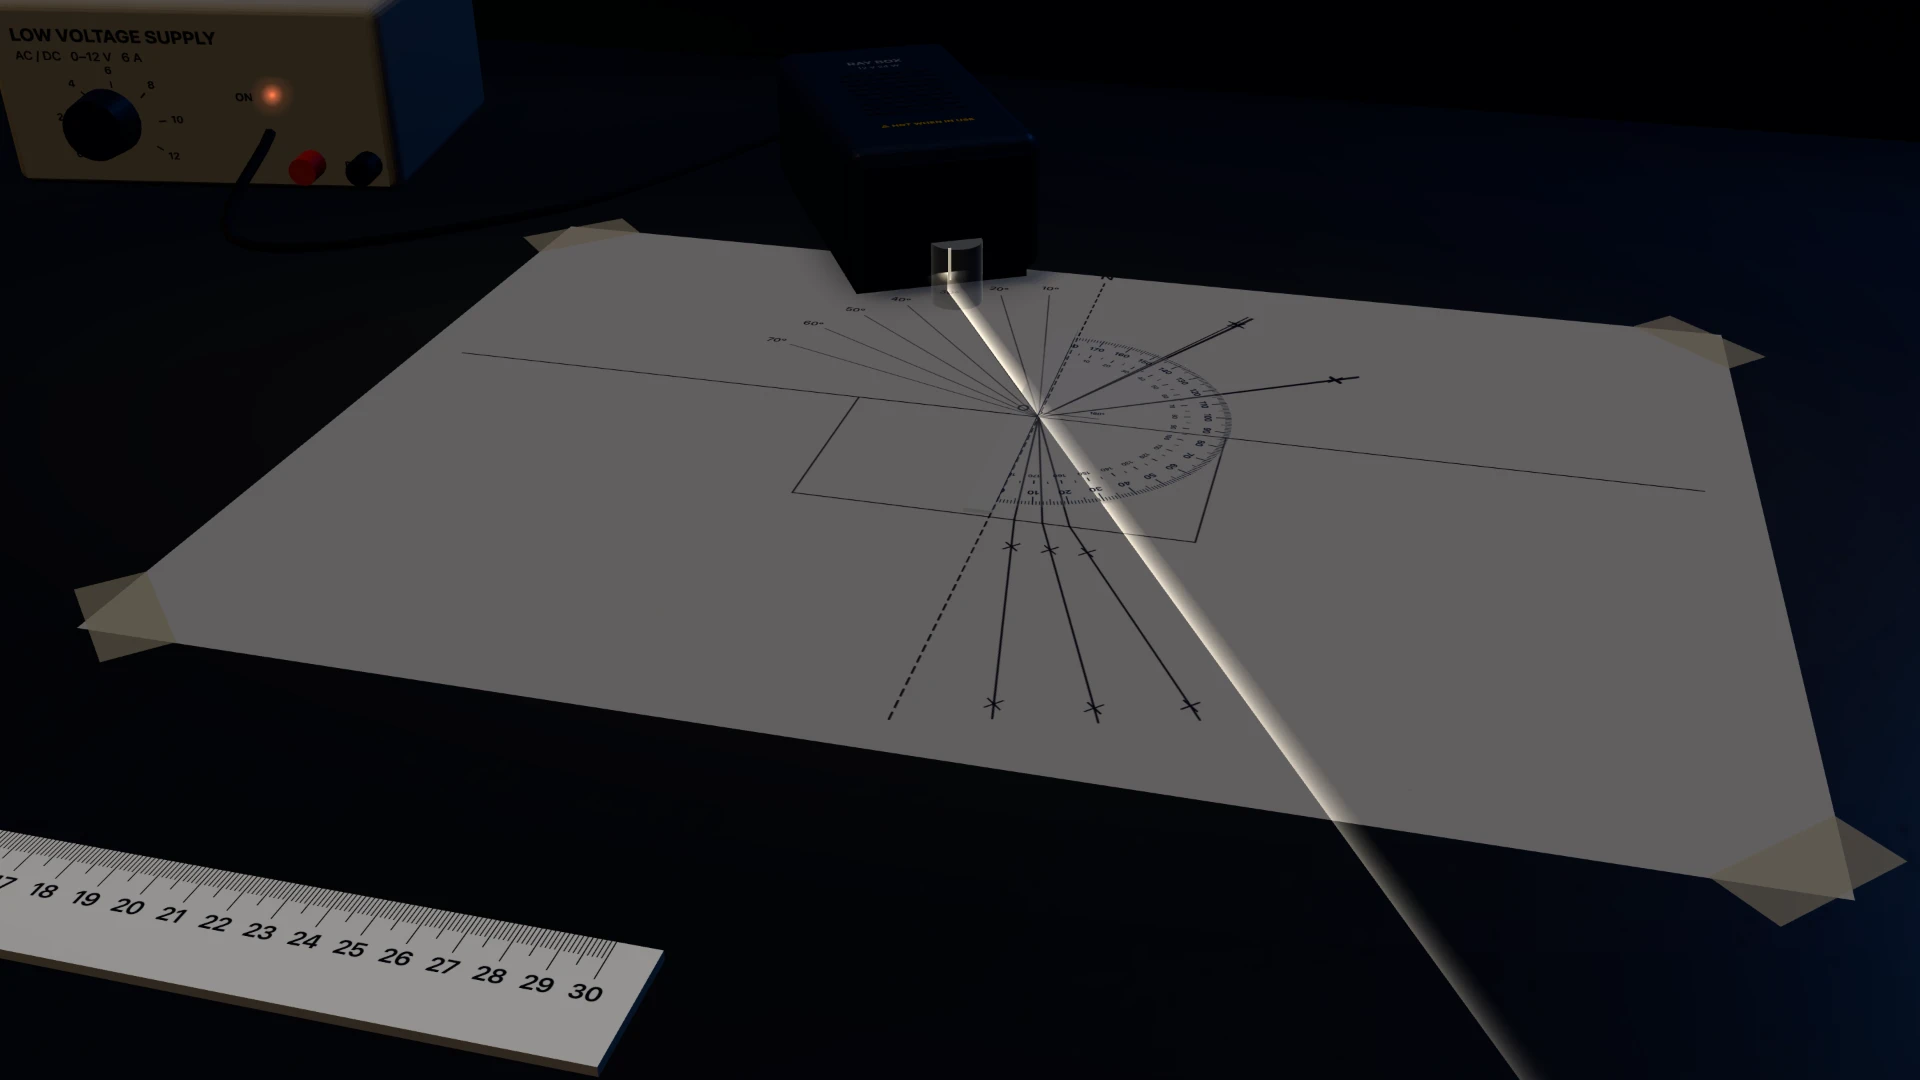
- On the 3D bench (Fig. 1) you set out the apparatus and read each instrument where it stands.
- In the 2D close-up (Fig. 2) the same instrument is drawn large, from the same run, for an exact reading. It is also how the practical runs on a device that cannot show 3D.
- In your table you write what you read, to the instrument’s resolution, and the notebook checks it against the instrument.
How to read it. Each small division is 1°. Read the row of numbers that starts at 0° on the normal. Slide the line round the arc to the middle of your pencil line.
What it shows
angle of incidence = angle of reflection
A smooth surface reflects light at the same angle it arrives at, measured from the normal (a line at 90° to the surface). When light goes from air into glass or Perspex it slows down, so it bends towards the normal: the angle of refraction is smaller than the angle of incidence.
The graph to expect. The angle of refraction rises with the angle of incidence, but less and less steeply: a curve, not a straight line.
No equation to learn. A rule, not a calculation. Measure both angles from the normal, not the surface.
Apparatus
| Item | What it is for | Resolution |
|---|---|---|
| Ray box with a single-slit card and lens, and a 12 V power supply | Makes a narrow ray of light. | — |
| Sheet of plain A3 paper and tape | You draw the lines and mark the rays on it. | — |
| Sharp pencil | Draws thin, exact lines and crosses. | — |
| 30 cm ruler | Draws the surface line and joins the crosses. | 1 mm |
| Protractor (180°) | Draws the normal and the incident lines, and measures the angles. | 1° |
| Plane mirror in a holder | Reflects the ray (specular reflection). | — |
| Rectangular glass block | Refracts the ray. | — |
| Rectangular Perspex block, the same size | Refracts the ray: compared with glass. | — |
Method
In our own words, as the Lab runs it. Your school's method sheet may differ in detail.
Which version are you doing?
Boards set this practical differently. Your course setting picks one; you can change it before you start.
Why: Each version is a fair way to do the practical. The bench, the readings and the exam questions follow your board.
Make a narrow ray
Fit the single-slit card and the lens to the ray box. Switch on and move the lens until the ray is one thin, sharp line.
Why: You mark the centre of the ray with a cross. The narrower the ray, the more exactly you can find its centre.
Draw the surface line
Use the ruler to draw a straight line across the middle of the A3 paper, parallel to its long side.
Why: The mirror and each block are placed against this line, so it marks the surface the light meets.
Draw the normal
Draw a line at right angles to the surface line, through its middle. Label it N. Where it meets the surface line is the point O.
Do: With the protractor, at 90°.
Why: Every angle (incidence, reflection and refraction) is measured from the normal, so it must be exactly 90° to the surface.
Draw the incident rays
With the protractor centred on O, draw incident lines on the ray-box side of the normal. Which angles of incidence will you use for the blocks?
Do: 10° to 70°, every 10°.
Why: The mirror is traced at 30° and 60°. For the blocks, the angles you choose decide how well you can see the shape of the graph.
Draw round the block
Put the longest side of the glass block against the surface line, with O in the middle of it. Without moving the block, draw carefully round it.
Why: The outline shows where the block was after you lift it off, and lets you put it back in exactly the same place.
Clear the gangwaysSafety
Put bags and stools under the benches before the room is darkened.
Why: In a darkened room it is easy to trip over things you cannot see.
Darken the room
Close the blinds and switch off the room lights while you mark the rays.
Why: The reflected and refracted rays are faint. In the dark their edges, and so their centres, are much easier to see.
Take the readings
Mirror: shine the ray at 30° and then 60° to the normal, mark the reflected ray and measure the angle of reflection with the protractor, three times each. Blocks: draw round the block, shine the ray at 10° to 70° (every 10°), mark where it leaves the block, join the points and measure the angle of refraction; glass first, then Perspex.
Repeats: Trace each mirror angle three times, moving the ray box away and back each time, and take the mean. The spread (range) shows the random error; half the range is the uncertainty. For the blocks, collecting more angles of incidence gives better evidence than repeating the same ones.
Make safe and clear upSafety
Switch off the ray box and switch the room lights back on. Leave the ray box to cool, then move it by its base. Put the glass and Perspex blocks back in their padded box, and the mirror in its holder. Label each part of your traced sheet (mirror, glass, Perspex) and keep it with your results.
While you take readings
Mark the crosses
Where will you put the crosses on each ray you mark?
Do: Far apart: one near the block, one about 9 cm away.
Why: Each ray is drawn by joining crosses. Any error in a cross tilts the line, and how much depends on how far apart the points are.
Measure the angles
Where do you measure each angle from? Whichever you choose, sit the centre of the protractor on O and look straight down on its scale, not from the side.
Do: From the normal (the line N).
Why: The law of reflection and the angles in exam questions are all measured from the normal.
Hazards and control measures
| Hazard | What could happen | Control measure |
|---|---|---|
| Hot ray box lamp | Burns to the fingers | Switch the ray box off when it is not in use, move it by its base and let it cool before packing it away. |
| Darkened room | Trips and falls | Put bags and stools under the benches before the lights go off, and walk slowly. |
| Edges of the glass block and mirror | Cuts | Hold the blocks and mirror by their faces, report any chipped edge and do not drop them. |
| Mains power supply for the ray box | Electric shock | Check the leads are not damaged and keep water away from the power supply. |
Variables
- Independent: you change
- Angle of incidence in degrees
- Dependent: you measure
- Angle of refraction (and angle of reflection) in degrees
- Control: you keep the same
- Point where the ray meets the block. Always aim at O, where the normal meets the block.
- The incident lines. Use the same lines for the glass and the Perspex block.
- Position of the block. Keep the block on its outline.
Results from a specimen run
| Trial | Angle of reflection (i = 30°) in degrees | Angle of reflection (i = 60°) in degrees |
|---|---|---|
| 1 | 30 | 62 |
| 2 | 31 | 60 |
| 3 | 32 | 61 |
| Mean | 31.0 | 61.0 |
| Angle of incidence in degrees | Angle of refraction (glass) in degrees | Angle of refraction (Perspex) in degrees |
|---|---|---|
| 10 | 7 | 7 |
| 20 | 13 | 13 |
| 30 | 18 | 19 |
| 40 | 25 | 25 |
| 50 | 30 | 31 |
| 60 | 35 | 35 |
| 70 | 36 | 40 |
Processing the data
- The law of reflection
- The angle of reflection equals the angle of incidence, within experimental accuracy.
- Uncertainty in the mean
- 1.0°
- Shape of the graph
- As the angle of incidence increases, the recorded angle increases, but less and less steeply: a curve.
- Glass or Perspex?
- No: the differences are no bigger than the protractor’s resolution (1°) and the scatter in my results, so I cannot tell.
| Quantity | Specimen run | Accepted |
|---|---|---|
| Mirror at 30°: mean angle of reflection | 31.0° | 30.0° |
| Mirror at 60°: mean angle of reflection | 61.0° | 60.0° |
| Glass at 50°: angle of refraction | 30.0° | 30.3° |
| Perspex at 50°: angle of refraction | 31.0° | 30.9° |
Across 120 simulated careful groups, refractive index of the glass (beyond GCSE, for teachers) (n) came out between 1.48 and 1.54 (median 1.51). That is the simulation's model, not a promise of what a real class gets.
Common mistakes and the fix
Mistakes to check in this practical, and what to do instead. In a write-up or an exam answer, the mark goes to naming the step and saying what it does to the readings.
Method: Use the wide ray as it is
Without the lens the ray is 3–5 mm wide. It is harder to judge where its centre is when you mark each cross, so your angles scatter more (a random error two to three times bigger).
The fix: Make a narrow ray. You mark the centre of the ray with a cross. The narrower the ray, the more exactly you can find its centre.
Method: By eye
Your normal will be 1–3.5° off 90°. Every angle is measured from it, so every angle of reflection reads the same few degrees too big (or too small) and every angle of refraction a little the other way. That is a systematic error, and repeating the readings cannot remove it.
The fix: Draw the normal. Every angle (incidence, reflection and refraction) is measured from the normal, so it must be exactly 90° to the surface.
Method: Only 20°, 40° and 60°
Only three points: you cannot be sure of the shape of the graph between them or beyond them, and an anomalous point is hard to spot.
The fix: Draw the incident rays. The mirror is traced at 30° and 60°. For the blocks, the angles you choose decide how well you can see the shape of the graph.
Exam answer: Answer 183 ° (no marks)
The fix: You added the three angles but did not divide by 3: 183 ÷ 3 = 61°.
Exam answer: Answer 61 ° (gains 1 mark)
The fix: Right: given to the nearest degree, like the readings.
Worked exam-style questions
Written for Study Hack in the style of exam questions, on the specimen run above. They are not taken from any exam board's papers. Try each one before you open the worked answer.
- Question 1Uncertainty from repeats · Applying knowledge[2 marks]
Determine the uncertainty in the mean angle of reflection.
Use Table 1.
Uncertainty = ± °
Worked answer and how the marks are given
A full-mark answer
range = 62 − 60 = 2°
uncertainty = 2 ÷ 2 = ±1°Mark scheme
- Range = 62 − 60 = 2° (method)
- Uncertainty = ±1°
- Allow answers from 0.9500 to 1.050 ° (the marker's tolerance; correct rounding of the student's own working is also accepted).
- Allow the unit written as degrees, degree, deg, degs, o.
- A correct answer with no working scores full marks.
Where marks are usually lost
- Answer 2 ° (gains 1 mark). 2° is the range. The uncertainty is half the range: 2 ÷ 2 = ±1°.
- Answer 61 ° (no marks). That is the mean. The uncertainty is half the range: (62 − 60) ÷ 2 = ±1°.
- Missing: Range = 62 − 60 = 2°. First find the range: largest value − smallest value.
- Question 2Random error · Analysing and evaluating[1 mark]
The three angles of reflection in Table 1 are different.
Name the type of error that caused this.
Worked answer and how the marks are given
A full-mark answer
Random error.
Mark scheme
- Random (error); do not accept "human error" Do not accept “human”, “systematic”.
Where marks are usually lost
- Missing: Random (error); do not accept "human error". Repeats that scatter either side of the true value show a random error. "Human error" never scores.
- Question 3Describing the method · Knowledge[6 marks]
A student has a ray box, a rectangular glass block, a protractor, a ruler, a sharp pencil and a sheet of paper.
Describe a method the student could use to investigate how the angle of refraction depends on the angle of incidence.
Methods that only use a mirror and reflection score no marks.
Worked answer and how the marks are given
A full-mark answer
1. Place the glass block on a sheet of paper and draw around it.
2. Remove the block and draw a normal at 90° to one long side using a protractor.
3. Put the block back on its outline and use the ray box to shine a narrow ray of light at the point where the normal meets the block.
4. Mark the ray of light entering the block with crosses, and mark the ray emerging from the other side with two crosses far apart.
5. Remove the block and join the crosses to show the complete path of the ray through the block.
6. Use the protractor to measure the angle of incidence and the angle of refraction from the normal.
7. Repeat for a range of angles of incidence, increasing the angle in 10° intervals from 10° to 70°.Mark scheme
Indicative content:
- Place the glass block on the paper and draw around it
- Draw a normal at 90° to the surface
- Use the ray box to shine a ray of light at the block (where the normal meets it)
- Mark the ray of light entering the block
- Mark the ray of light emerging from the block
- Remove the block and join the points to show the complete path of the ray
- Use a protractor to measure the angle of incidence
- Use a protractor to measure the angle of refraction
- Use a range of different angles of incidence
- Increase the angle of incidence in 10° intervals from 10° to 70° (allow 60° or 80°)
- Allow: optical pins instead of a ray box
Levels of response Level Marks What the answer does 3 5–6 A coherent method that would give valid results: all the important steps are there, in a sensible order. 2 3–4 A method that might not give valid results: most of the important steps are there, but some are missing or out of order. 1 1–2 A method that would not give valid results: some relevant steps are given, but they are not linked into a workable method. In Study Hack a six-mark answer is not given an automatic level: you tick the points your answer makes, then choose the level that fits it.
- No relevant content: 0 marks.
Evaluate
| Source of error | Type | Effect | Improvement |
|---|---|---|---|
| Judging where the centre of the ray is when you mark each cross | Random | Each cross can be a little to one side of the centre, so each angle can be a degree or so out either way. A wide or faint ray makes this worse. | Use a narrow ray (single slit and lens) in a darkened room, and mark the centre of the ray carefully. |
| Crosses close together on the ray | Random | A small error in one cross swings the line through a bigger angle, so the angles scatter more. | Put the crosses far apart: one near the block and one at least 8 cm away. |
| Normal drawn by eye, not at 90° to the surface | Systematic | Every angle of reflection is too big (or too small) by the same amount, and every angle of refraction a little the other way. | Draw the normal with a protractor at exactly 90° to the surface line. |
| Measuring the angles from the surface instead of the normal | Systematic | Every recorded angle is 90° minus the real angle. | Put the protractor’s centre on O and its 0° line on the normal, and measure every angle from the normal. |
| Not putting the ray box or the block back in exactly the same place | Random | Each repeat is traced a little differently, so the values spread out; a knocked block gives an anomalous angle. | Draw round the block and check it is on its outline before every trace; line the ray up with the pencil line each time. |
| Resolution of the protractor (1°) | Random | Angles can only be recorded to the nearest degree, so a difference smaller than 1° (glass against Perspex) cannot be seen. | Use a larger protractor with a finer scale, or work the angles out from measured lengths, to tell glass from Perspex. |
Repeatable. When you trace the same mirror angle three times with the same apparatus, your angles of reflection agree closely.
Reproducible. Another student, or a different method (optical pins instead of a ray box), gets similar angles for the same block.
Other exam boards
How this practical lines up with other GCSE boards' required or core practicals. Codes only; check your own specification for the exact activity.
| Board | Practical | Match | What is different |
|---|---|---|---|
| AQA | Required practical 9 | This page | — |
| Edexcel | 5.9 | Similar, with differences | Refraction only, framed as electromagnetic waves meeting matter. |
Print it
- Blank write-up: the nine-step lab book with the correct table headings, ready to print for a real lesson.
- Specimen lab book: this page's run written up in full, with its exam answers ticked against the mark scheme.
- Printable method card: the practical on one index card. Practise with the cards in Study Hack.
- Practical workbook: a full simulated data set to process on paper, with exam questions and answers.
- Teacher and technician pack: apparatus lists, technician notes and marking points.